


Quick Summary
As cryptocurrency mining continues to evolve, miners are constantly looking for ways to increase efficiency, reduce costs, and extend the life of their equipment. One of the most innovative solutions to these challenges is immersion cooling. Unlike traditional air cooling, which relies on fans and heatsinks to dissipate heat, immersion cooling involves submerging mining hardware in a special non-conductive fluid that absorbs and removes heat much more effectively.
If you’re running an ASIC miner, you know that maintaining optimal temperatures is crucial for consistent performance and avoiding damage from overheating. With immersion cooling, you can achieve better heat management while reducing power consumption, making it an attractive option for serious miners looking to scale up their operations.
In this guide, we’ll walk you through the process of setting up immersion cooling for your ASIC miner from understanding the basics to troubleshooting common issues. Whether you’re new to immersion cooling or looking to optimize your existing setup, this post will provide you with all the information you need to make the most out of this cutting-edge cooling solution.
What Is Immersion Cooling?
If you’ve ever used a desktop computer or a gaming console, you probably know they need cooling fans to keep them from overheating. Well, ASIC miners those powerful machines used to mine cryptocurrencies like Bitcoin get even hotter because they work non-stop, 24/7. That’s where immersion cooling comes in.
So, what exactly is immersion cooling? It’s a method of cooling your ASIC miner by fully submerging it in a special liquid. Sounds wild, right? But don’t worry this liquid isn’t water. It’s a non-conductive fluid, which means it won’t cause any short circuits or damage your equipment. In fact, it helps cool your machines much more efficiently than air.
Picture this: Instead of relying on noisy fans to push hot air away from your miner, the heat gets absorbed directly by the liquid. Then, the fluid is circulated and cooled down using a pump and a radiator or heat exchanger. It’s quiet, effective, and keeps your machines running at optimal performance.
Why Use Immersion Cooling for ASIC Miners?
You might be wondering, “Why go through all this trouble? Aren’t fans good enough?” Well, here’s the thing immersion cooling has some big advantages, especially if you’re serious about mining.

1. Better Performance: When your miner stays cool, it can work harder and longer without throttling down or crashing. Some users even get more hash power because of the stable temperatures.
2. Quieter Operation: Fans are loud, especially when you’ve got several miners running. Immersion cooling almost eliminates fan noise. That’s a huge bonus if your setup is at home or near a work area.
3. Longer Lifespan: High heat is the enemy of electronics. By keeping your miner cool all the time, you’re reducing wear and tear, which can help it last longer.
4. Less Dust: Traditional setups suck in air and along with it, dust. Dust buildup can hurt performance and even damage components. With immersion cooling, your miner stays clean inside the fluid.
5. Energy Efficiency: You might save money on cooling costs. Immersion systems can be more energy-efficient than running dozens of fans or big HVAC units to manage heat.
Types of Immersion Cooling Systems

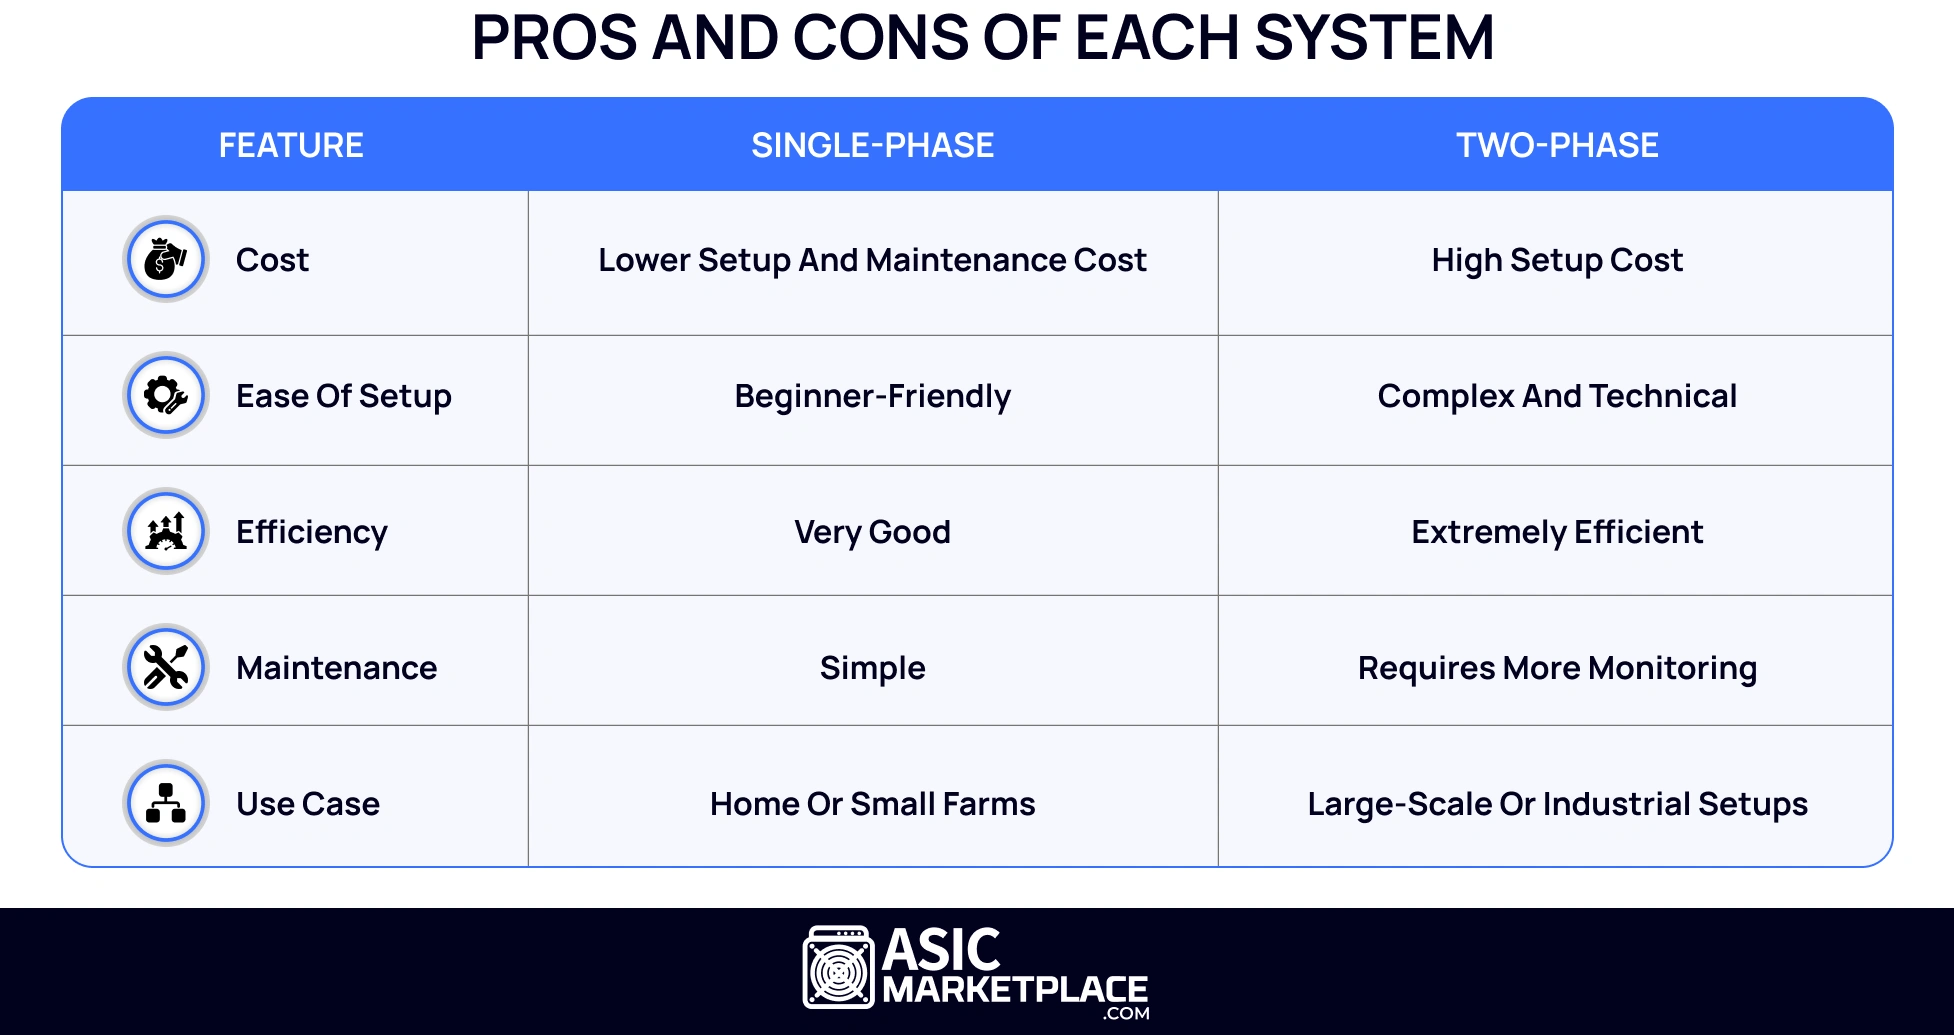
1. Single-Phase Cooling
This is the most beginner-friendly type and is what most small to mid-size crypto miners use. In a single-phase system, your ASIC miner is submerged in a non-conductive liquid (like mineral oil or a synthetic fluid), and that fluid stays in liquid form the whole time it doesn’t boil or change into a gas.
Here’s how it works:
- The fluid absorbs the heat from your miner.
- A pump moves the warm fluid to a heat exchanger or radiator.
- The radiator cools the fluid down, and it’s sent back into the tank.
Simple, clean, and relatively low maintenance.
2. Two-Phase Cooling
This one’s a bit more high-tech. In a two-phase system, the cooling liquid is designed to boil at a low temperature. When your miner heats up, the liquid boils into vapor, pulling heat away quickly. Then, the vapor rises, hits a condenser at the top of the tank, and turns back into liquid. That liquid drips back down into the tank kind of like rain.
It’s super efficient, but:
- It’s more expensive.
- The setup is more complex.
- It usually requires a sealed tank and precise control systems.
Unless you’re running a massive mining farm or want to experiment with cutting-edge tech, single-phase is the way to go for most home or small-scale miners.
~ Pros and Cons of Each System
Let’s compare both sides so you can decide what’s right for you.
Choosing the Right Dielectric Fluid
Alright, so you’re ready to dunk your miner into a tank of liquid but wait! You can’t just grab any oil or fluid off the shelf. Choosing the right dielectric fluid is one of the most important steps in immersion cooling.
~ What Is Dielectric Fluid?
A dielectric fluid is a special type of liquid that doesn’t conduct electricity. That’s key because your ASIC miner has live electronic components. If you dropped it in water or any regular oil, you’d fry your gear instantly.
Dielectric fluids are made to pull heat away from your equipment without causing any short circuits or damage. Think of it as a safe, cooling bath for your miner.
Now, there are a few types of fluids you can use, and each has its pros and cons.
~ Commonly Used Fluids
Here are some popular options that miners use today:
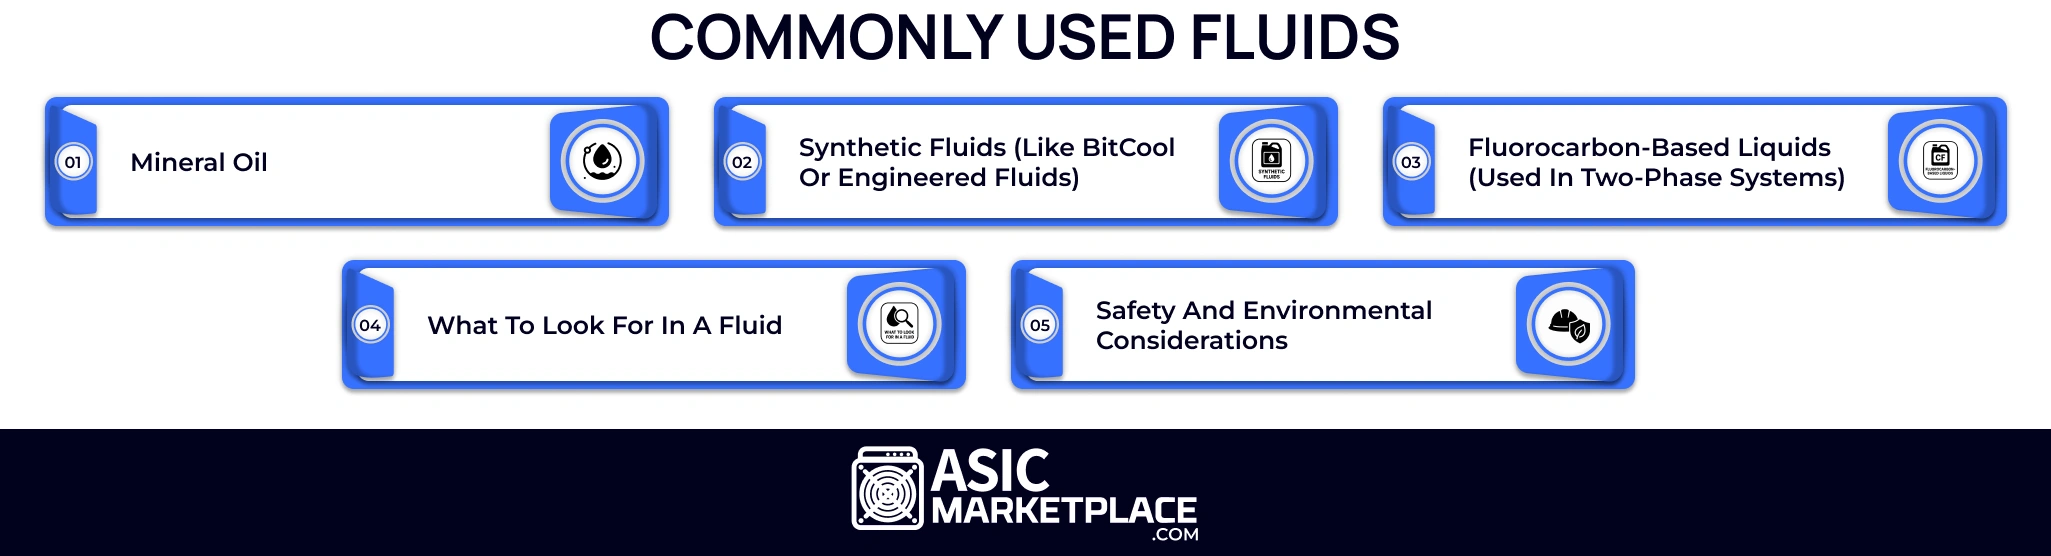
1. Mineral Oil
- Pros: Cheap, easy to find, works well.
- Cons: It can be messy, thick, and not as efficient in heat transfer as some other fluids.
- Note: Not all mineral oils are pure. Look for white mineral oil that’s food or pharma-grade no additives.
2. Synthetic Fluids
- Pros: Made specifically for immersion cooling, better heat transfer, low maintenance.
- Cons: More expensive than mineral oil.
- Best for: Long-term use with lower chances of clogging or fluid breakdown.
3. Fluorocarbon-Based Liquids
- Pros: Super efficient, evaporates cleanly, and is great for advanced setups.
- Cons: Extremely expensive and mainly used in industrial environments.
4. What to Look for in a Fluid
When picking a dielectric fluid, here are a few things you should keep in mind:
- Non-conductive: This is a must. Check product specs for dielectric strength.
- Low viscosity: Thinner fluids move easier and cool better.
- Low odor and low toxicity: Especially important if your mining setup is indoors.
- Thermal stability: The fluid should handle high temperatures without breaking down.
- Oxidation resistance: You want a fluid that won’t turn dark or go bad quickly when exposed to air and heat.
5. Safety and Environmental Considerations
Remember, you’re not just cooling electronics you’re working with chemicals. Always:
- Store fluids properly in a cool, sealed container.
- Keep away from open flames or sparks.
- Wear gloves when handling, especially with synthetic fluids.
- Dispose of used fluid responsibly don’t pour it down the drain!
Some fluids are biodegradable or recyclable, so it’s worth checking the manufacturer’s guidelines.
Required Equipment and Components
So, you’ve picked the type of immersion cooling system you want and chosen your fluid. Now it’s time to talk about what gear you’ll actually need to bring it all together. Don’t worry this part isn’t as complicated as it sounds. Think of it like building a fish tank… but for your ASIC miner.
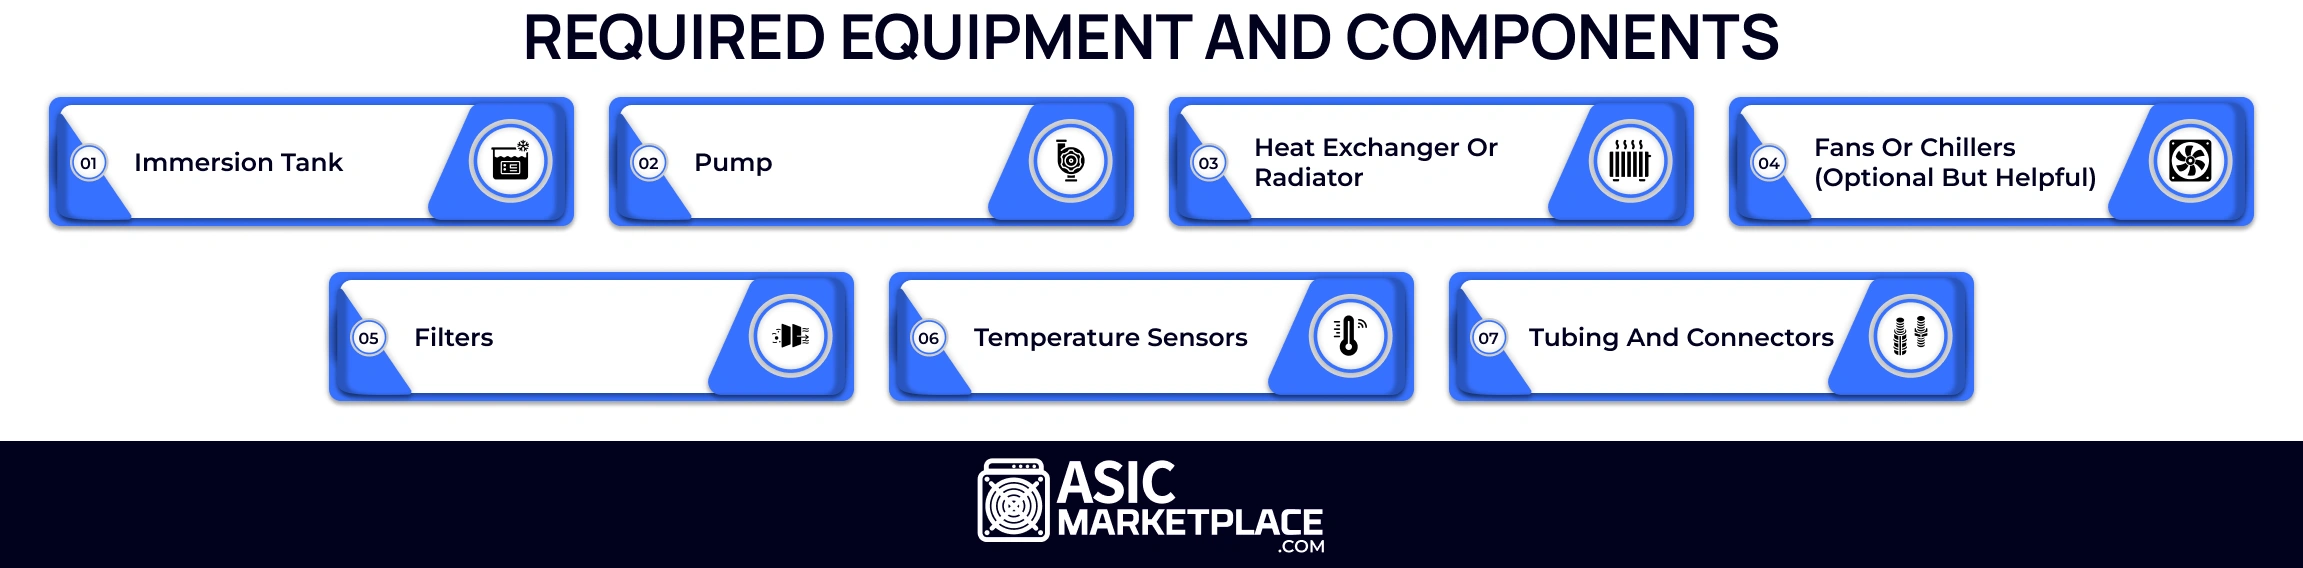
1. Immersion Tank
This is your miner’s new home. The tank is what holds your miner and the cooling fluid. It doesn’t need to be fancy, but it must be strong and leak-proof.
~ Options include:
- Stainless steel tanks (professional and durable)
- Acrylic or polycarbonate containers (transparent, easier to see inside)
- DIY tanks made from plastic storage bins (budget-friendly but risky—make sure they can handle heat and weight)
2. Pump
The pump moves the fluid around. This helps carry heat away from your miner to a place where it can be cooled down.
~ What to look for:
- Must be compatible with your cooling fluid
- Should be quiet and reliable
- Look for one with a decent flow rate (usually measured in liters per minute or GPM)
3. Heat Exchanger or Radiator
This is where the real cooling happens. The fluid heated by your miner runs through the radiator or heat exchanger, which then dumps that heat into the air or water.
~ Types:
- Air-cooled radiators (similar to car radiators, with fans)
- Water-cooled systems (coolant runs through pipes and is chilled separately)
If you live in a cooler climate or don’t want fans, a water loop might be quieter and more efficient.
4. Fans or Chillers (Optional but Helpful)
If you’re using a radiator, fans help pull air across it to cool things down. Some miners use PC fans, while others go big with industrial ones.
If you want more serious cooling, a chiller (like an air conditioner for fluids) can keep your temps super low, but it’s more expensive and uses more power.
5. Filters
Over time, your fluid can pick up dust, small debris, or metal flakes from your miner. A simple inline filter keeps things clean and helps your system last longer.
~ Look for:
- Easy-to-clean filters
- Ones that match the size of your tubing
6. Temperature Sensors
You’ll want to keep an eye on your fluid temperature. Too hot, and your miner could throttle or fail. A cheap digital thermometer or probe can save you a lot of trouble.
7. Tubing and Connectors
You’ll need flexible, heat-resistant tubing to move fluid between the tank, pump, and radiator. Also, grab some hose clamps or quick-connect fittings to avoid leaks.
Planning Your Setup
Before you start assembling tanks and pouring in cooling fluid, it’s super important to plan your setup properly. This step might not seem exciting, but it can save you a ton of headaches later. Let’s walk through the basics of what you should think about before you dive in literally and figuratively!
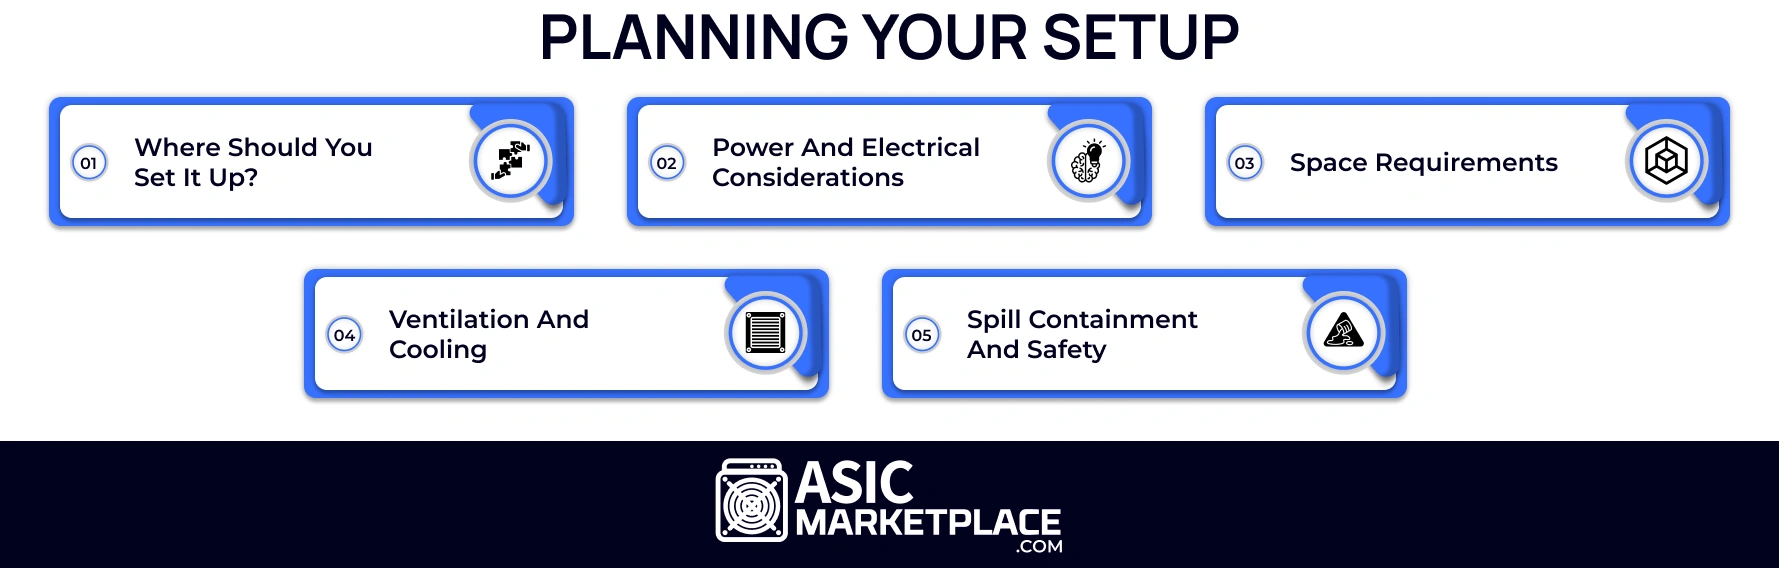
1. Where Should You Set It Up?
Your immersion cooling system isn’t something you can just place anywhere. Once it’s filled with fluid and a miner, the setup can weigh 100 to 200 pounds or more. So, make sure you choose a spot that:
- It has a strong, level surface (concrete floors are ideal)
- Is well-ventilated, especially if you’re using a radiator or fans
- Has access to power and internet
- Is safe from kids, pets, and random accidents
If it’s indoors, try to keep it in a garage or dedicated room to avoid fluid smells or noise. If it’s outdoors, protect it from rain, dust, and direct sunlight.
2. Power and Electrical Considerations
ASIC miners use a lot of electricity. Make sure your power setup can handle the load safely.
- Use dedicated breakers if possible.
- Check the voltage and amperage your miner needs
- Consider using surge protectors or uninterruptible power supplies (UPS) for extra safety.
- Keep electrical connections above fluid level and away from moisture.
3. Space Requirements
Think ahead. Ask yourself:
- How many miners will I use now?
- Will I add more later?
- Do I need space for extra fluid storage, maintenance tools, or airflow?
Leave some space around the tank so you can move around it easily when you need to check or clean something.
4. Ventilation and Cooling
Even though immersion cooling is great at absorbing heat, the system still needs to release that heat somewhere. If you’re using a radiator with fans, make sure it has space to “breathe.” If it’s too close to a wall or boxed in, it won’t work efficiently.
If you’re using a water loop or chiller, make sure your tubing can reach safely without getting kinked or pinched.
5. Spill Containment and Safety
This part’s important no one wants a puddle of oil on the floor.
- Use a drip tray or secondary container under your tank.
- Keep absorbent pads or towels nearby for quick cleanups.
- Label your containers if you’re storing extra fluid.
- Have gloves and goggles handy in case of splashes
Also, make sure nothing flammable is near your setup no paper, cardboard, or exposed wires.
Step-by-Step Installation Guide
This is where everything comes together. Don’t worry if you’ve never done anything like this before just take it one step at a time, and you’ll be fine. Let’s build your ASIC miner’s new spa!
What You’ll Need (Quick Recap)
- ASIC miner
- Immersion tank (sturdy and leak-proof)
- Dielectric fluid (like mineral oil or BitCool)
- Pump (submersible or external)
- Radiator or heat exchanger
- Fans or chiller (optional)
- Tubing and hose clamps
- Temperature sensor (optional but helpful)
- Gloves, paper towels, and a funnel
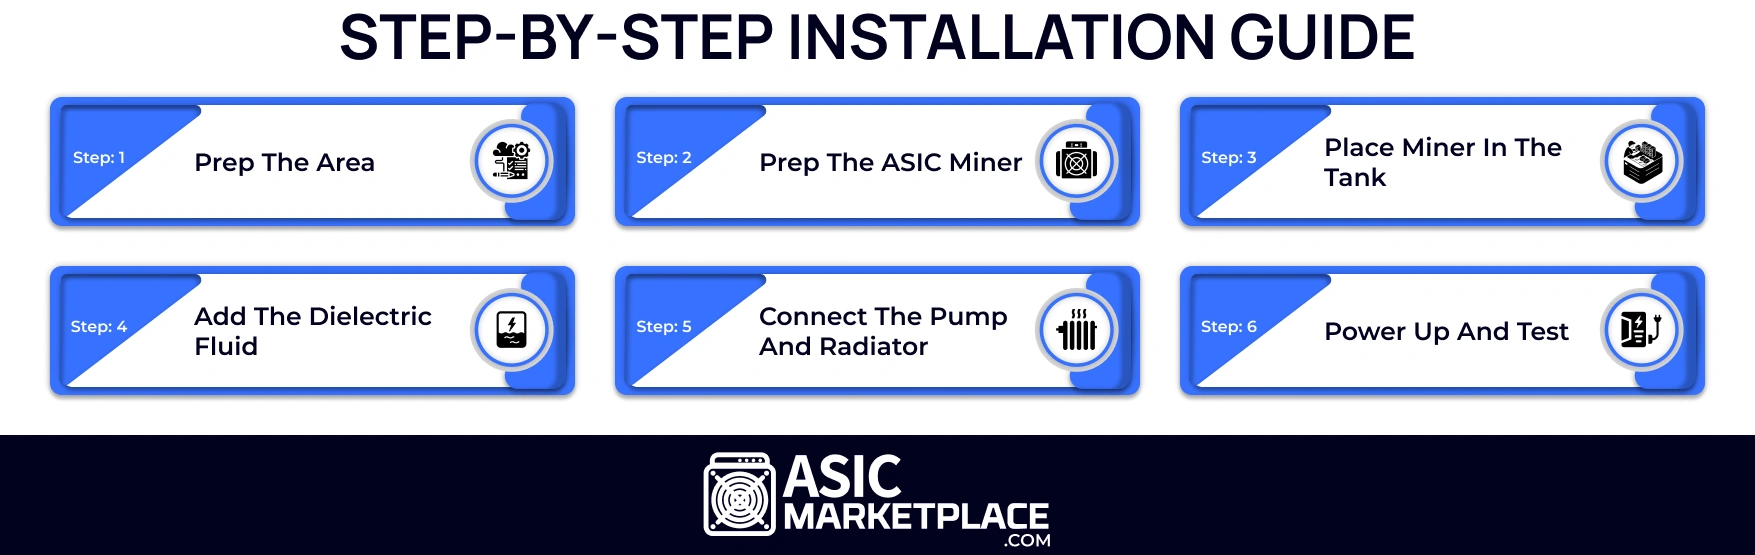
Step 1: Prep the Area
Before you unpack anything:
- Clean the space where your setup will go.
- Lay down a tarp or tray in case of spills.
- Set up your power source, but don’t plug in anything yet.
Step 2: Prep the ASIC Miner
This is super important:
- Remove all the external fans from your miner. They’re not needed in liquid and can cause problems.
- Check for any loose wires or dust give it a quick cleaning.
- Some people wrap the power supply (PSU) in plastic and leave it outside the tank. Others submerge it, too, but only if it’s safe to do so. (Check your PSU’s design.)
Step 3: Place Miner in the Tank
Gently lower your miner into the tank. Use something to hold it up if you don’t want it sitting right on the bottom like a small metal rack or plastic spacer.
Make sure:
- The miner is completely inside.
- You leave room around it for fluid to flow.
Step 4: Add the Dielectric Fluid
Slowly pour in your fluid until the entire miner is fully submerged. Take your time.
- Leave a few inches of space at the top of the tank to avoid spills.
- If your tank has a fill line, stop there.
- Use gloves and a funnel to avoid messes.
Step 5: Connect the Pump and Radiator
Now that the miner is swimming let’s make the fluid flow.
- Connect your tubing from the tank to the pump and then from the pump to the radiator.
- From the radiator, run the tubing back to the tank to complete the loop.
- Use hose clamps to secure every connection.
Turn on the pump briefly (without powering the miner) to test fluid flow.
Make sure:
- There are no leaks.
- The fluid is moving smoothly through the radiator and back.
Step 6: Power Up and Test
Now, the moment of truth.
- Plug in your miner and PSU.
- Power it on.
- Check the temperature after 5–10 minutes.
- Watch for any strange sounds, smells, or signs of overheating.
If everything looks good, congrats you’re running immersion-cooled!
Monitoring and Maintenance
Setting up immersion cooling is just the beginning. To keep your ASIC miner running smoothly, you’ll need to do a bit of ongoing monitoring and maintenance. Don’t worry it’s not hard or time-consuming. In fact, most of it can be done with just a quick weekly check-up.
~ Monitoring Your System
Keeping an eye on a few key things will help you spot problems before they become expensive.

1. Temperature
- A digital thermometer or sensor is used to monitor the fluid temperature.
- Ideal range: 40°C to 60°C (104°F to 140°F).
- Too hot? Check your radiator or fan it might be clogged or not working properly.
2. Pump Operation
- You should be able to hear or feel the pump working.
- Check for vibrations or unusual sounds.
- Watch the fluid if it looks still or sluggish, your pump may be clogged or dying.
3. Fluid Level
- Check for evaporation or leaks once a week.
- If the fluid looks lower than before, top it off with the same type you used.
- Be careful not to mix different types of fluids.
4. Miner Performance
Log into your miner’s dashboard and check:
- Hashrate (any big drops?)
- Temperature readings (if available)
- Fan error (should show zero if you removed them properly)
Power Consumption and Electricity Use
Electricity is one of the biggest costs in crypto mining. You want to get the best performance out of your ASIC miner, but you don’t want your power bills to skyrocket. Fortunately, immersion cooling can help optimize power consumption and even lower your costs. Let’s break down how this works and how you can get the most out of your system.
~ How It Affects Your Power Bills
While immersion cooling can help reduce power consumption in some areas, it’s important to note that the impact may vary depending on your specific setup. Here’s a quick breakdown of what to expect:
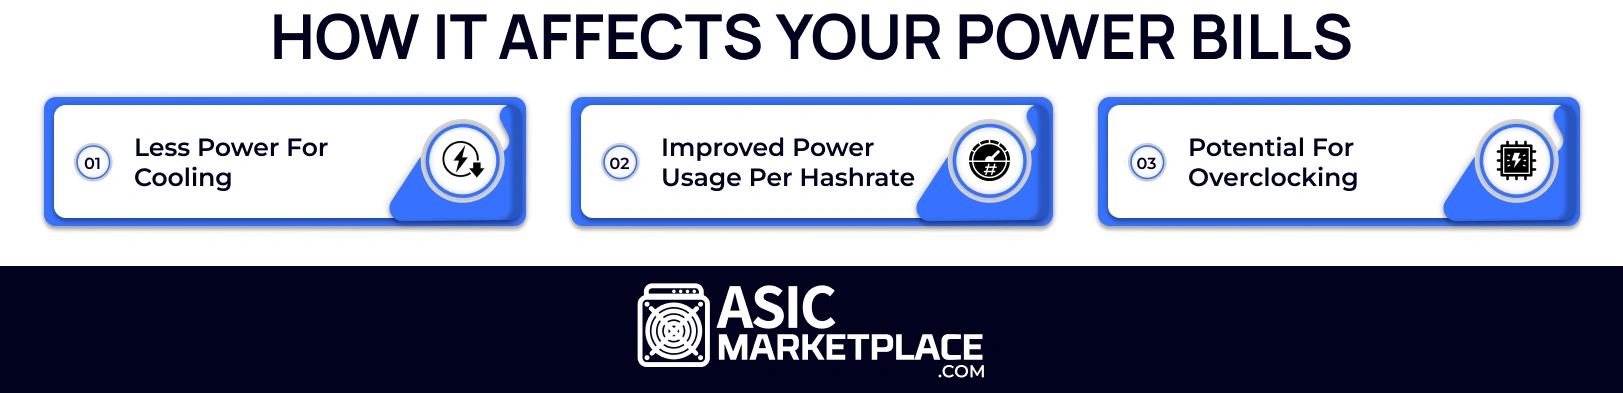
1. Less Power for Cooling:
- With air cooling, a large portion of the energy is consumed by fans and heatsinks trying to lower the miner’s temperature. With immersion cooling, you’re cutting down on that wasted power because the cooling process is more efficient.
- Fans on the heat exchanger still use some energy, but in most cases, it’s much less than the energy used by air-cooled fans.
2. Improved Power Usage per Hashrate:
- Thanks to more efficient cooling, your miner can run at a higher hash rate while using the same or less power. This is because immersion cooling allows the miner to avoid throttling, so you can push it harder without spiking power consumption.
3. Potential for Overclocking:
- As mentioned before, immersion cooling allows for safe overclocking, which means you can get more hashing power out of your miner.
- Overclocking typically results in higher power usage, but the efficiency gained by immersion cooling means your miner will likely consume less power per unit of hash than with air cooling.
Costs and Return on Investment (ROI)
When you’re setting up immersion cooling, you’ll need to consider the upfront costs, the long-term savings, and whether it’s worth the investment in the end. Let’s break it all down so you can make an informed decision.
~ Upfront Costs of Immersion Cooling
While immersion cooling can be an amazing upgrade, it does come with some initial costs. Here’s a quick rundown of what you can expect to spend:
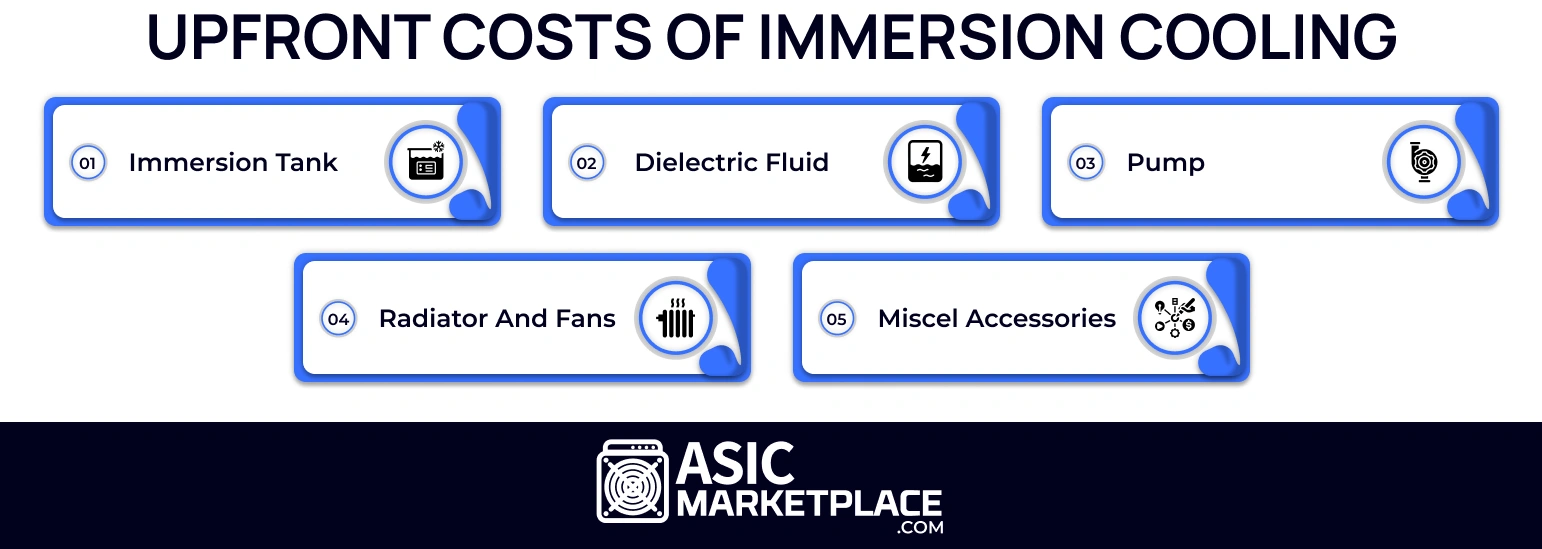
1. Immersion Tank:
- You’ll need a sturdy, leak-proof tank that can hold both the miner and the cooling fluid. Prices range depending on the size, material, and brand. Expect to pay between $100 and $500 for a good-quality tank.
- Some miners even DIY their tanks using plastic containers or custom-made solutions to save money but make sure they are sealed properly and safe for immersion.
2. Dielectric Fluid:
- The cooling fluid is one of the biggest expenses. Mineral oil is the most commonly used fluid, costing around $15 to $30 per gallon. For a standard immersion setup, you’ll need about 10-20 gallons to completely submerge one ASIC miner, depending on your tank size. That can add up to $150 to $600.
- Some alternative fluids like BitCool (designed specifically for immersion cooling) can cost more but are more efficient in the long run.
3. Pump:
- You’ll need a submersible pump to circulate the fluid. Pumps can cost anywhere from $30 to $200, depending on the quality and flow rate you need. If you’re running a large setup with multiple miners, a more powerful external pump can be more expensive.
4. Radiator and Fans:
- The radiator is needed to dissipate heat from the fluid. You’ll spend anywhere between $50 and $300 for a decent radiator setup, depending on whether you’re using air or water-based cooling. Adding fans will increase this cost, but they are relatively inexpensive, around $15–$50 each.
5. Miscellaneous Accessories:
- You might also need some tubing, hose clamps, filters, temperature sensors, and other small components, which could add another $50 to $100.
Calculating ROI
Let’s do a simple breakdown to see when you might start seeing a return on your investment.
Example Scenario:
~ Initial Setup Costs:
- Tank, fluid, pump, radiator, and accessories = $800 (average)
~ Power Savings:
- Let’s say your miner uses 3,000W with air cooling, and you reduce that to 2,800W with immersion cooling. That’s a savings of 200W per miner.
- If you run your miner 24/7, this equates to around 1.44 kWh per day in savings.
- Multiply that by your electricity rate (let’s assume $0.12 per kWh): 1.44 kWh/day x 365 days = 525.6 kWh per year 525.6 kWh x $0.12 = $63.07 savings per year per miner
If you have five miners, that’s $315.35 in savings per year.
~ Payback Period:
Now, with an initial cost of $800 and $315 in savings each year, it would take approximately 2.5 years to recover your initial investment. After that, you’re looking at pure savings.
Conclusion
Immersion cooling offers a game-changing solution for ASIC miners looking to optimize their performance, reduce energy consumption, and extend the lifespan of their equipment. By submerging your miners in a specially designed fluid, you can achieve more efficient heat dissipation compared to traditional air cooling methods, all while reducing the risk of overheating and minimizing the need for constant maintenance.
While the initial investment for immersion cooling may seem significant, the long-term savings in energy bills, extended miner lifespan, and decreased hardware failure rates make it a worthwhile investment for serious miners. With careful setup and regular maintenance, immersion cooling can help you unlock the full potential of your mining rig while ensuring it runs smoothly for years.
By following best practices, troubleshooting common issues, and optimizing power consumption, you can maximize your return on investment and enjoy consistent, reliable mining operations. If you’re looking to take your mining efficiency to the next level, immersion cooling is an excellent step forward in improving both performance and cost-effectiveness.
Check out the latest ASIC Miners 
Check Now 
FAQs on Immersion Cooling Setup for ASIC Miner
-
What is immersion cooling for ASIC miners?
Immersion cooling is a method where ASIC miners are submerged in a non-conductive fluid to absorb and dissipate heat. It keeps miners cool more efficiently than air cooling.
-
Is immersion cooling safe for mining equipment?
Yes, it’s completely safe when using the right dielectric fluid and proper setup. It can even extend the lifespan of your mining hardware.
-
How much does an immersion cooling setup cost?
A basic setup can cost between $500 to $1,000, depending on the equipment and fluid used. It’s an upfront investment with long-term savings.
-
Can immersion cooling increase mining performance?
Yes, immersion cooling allows for stable overclocking and better temperature control, which can improve hashrate and performance.
-
How often do I need to maintain an immersion cooling system?
Minimal maintenance is needed just check fluid levels, clean components occasionally, and monitor temperatures regularly.

Peter Davis
An experienced technical writer with over Four years of expertise in blockchain and cryptocurrency. Skilled in crafting in-depth blogs, he combines technical analysis with market insights to simplify complex concepts for readers. His passion for Web 3 technology and ASIC mining hardware is evident in his clear and engaging writing style.


